Upcoming maintenance
Dear Customers and Partners.
This website will be undergoing scheduled maintenance on June 14, 2023. Please be aware there may be disruption to the developer portal website and associated services during the scheduled maintenance period.
This upgrade is essential to ensure the continued performance, reliability, and security of Developer World.
We apologize for any inconvenience.
Debug with Arduino IDE
-
Hi,
Is it possible to debug the spresense board in arduino IDE.
In case it is not possible, what is the best option to debug the board program?Thanks,
-
You don't have a lot of debugging tools in the Arduino IDE. You can use Serial.print() to print variables or see if code is getting executed. Additionally, you can also use an LED that can indicate some status of your application.
Best Regards,
Kamil Tomaszewski -
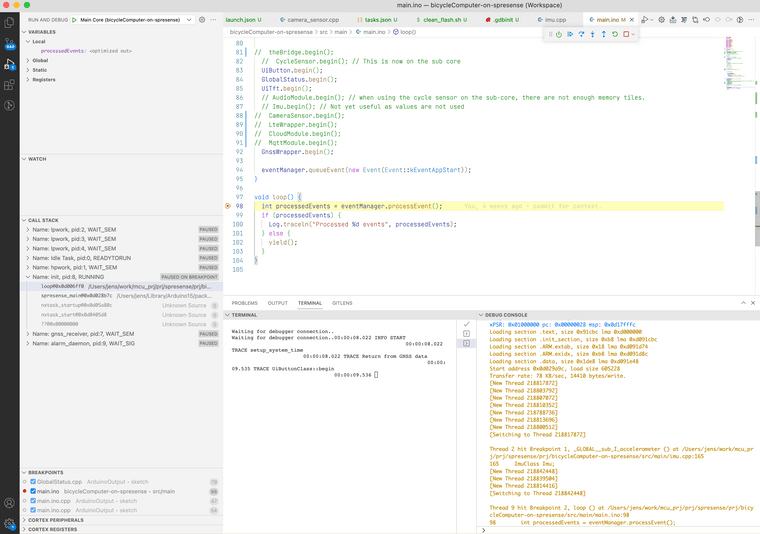
Not exactly Arduino IDE, but using Arduino Extension in VS Code. That mean using the Spresense Arduino SDK.
How to debug Spresense Arduino Sketches.
- Prepare the hardware according to Spresense Hardware Documents by attaching a CoreSight10 connector to the Extension or LTE board.
- Prepare a CMSIS-DAP compliant debug adapter as in Spresense SDK Getting Started Guide (IDE). However the first recomendation (Keil ULINK2) is very expensive and the second recomendation (LPC-Link2) is deprecated by the manufacturer. I bought the replacement recommendation MCU-Link Debug Probe. It is only about 15 USD and could be bought by Mouser and Digikey wordwide if there is no local distributor.
- Use Visual Studio Code with the Arduino plugin.
- Set the output in the .vscode/arduino.json. This is my file. Yours might differ in other options.
{ "sketch": "src/main/main.ino", "board": "SPRESENSE_local:spresense:spresense", "port": "/dev/tty.SLAB_USBtoUART", "configuration": "Core=Main,Memory=1152,Debug=Enabled,UploadSpeed=230400", "output": "../ArduinoOutput" }- Add the spresense folder of the GitHub - sonydevworld/spresense: Spresense SDK source code to your workspace. Some files for debug configuration will be referenced.
- Add a .vscode/launch.json with the following content. It is the same file that would be created for a Spresense SDK project. Only cwd and executable is replaced. cwd is the folder name of your workspace folder of the Arduino project. executable is the output path combined with the ino filename of the Arduino project and ".elf".
{ "version": "0.2.0", "configurations": [ { "name": "Main Core", "cwd": "${workspaceFolder:bicycleComputer-on-spresense}", "executable": "../ArduinoOutput/main.ino.elf", "request": "launch", "type": "cortex-debug", "servertype": "openocd", "configFiles": [ "interface/cmsis-dap.cfg", "cxd5602.cfg" ], "searchDir": [ "${workspaceFolder:spresense}/sdk/tools" ], "svdFile": "${workspaceFolder:spresense}/sdk/tools/SVD/cxd5602.svd", "debuggerArgs": [ "-ix", ".vscode/.gdbinit" ], "preLaunchTask": "Clean flash", "overrideLaunchCommands": [ "monitor reset", "monitor halt", "load" ], "overrideRestartCommands": [ "monitor sleep 3000", "monitor halt", "load" ] } ] }- Add a .vscode/tasks.json with the following content. This is a minimal extract of the tasks.json of a Spresense SDK project.
{ "tasks": [ { "label": "Clean flash", "type": "shell", "command": ".vscode/clean_flash.sh -s ${config:spresense.sdk.path} -c ${config:spresense.serial.port}", "group": "test", "problemMatcher": [ "$gcc" ] }, ], "version": "2.0.0" }- Create a file .vscode/clean_flash.sh with the following content. This is a copy of the clean_flash.sh of the .vscode folder of a Spresense SDK project.
#!/bin/bash # Temporary # Get platform type case "$(uname -s)" in Linux*) PLATFORM=linux ;; Darwin*) PLATFORM=macos ;; CYGWIN*|MINGW32*|MSYS*) PLATFORM=windows ;; *) echo "ERROR: Unknown platform" echo "" show_help ;; esac # Option handler SPRESENSE_SDK_PATH="" SPRESENSE_PORT="" while getopts s:c: OPT do case $OPT in 's' ) SPRESENSE_SDK_PATH=${OPTARG};; 'c' ) SPRESENSE_PORT=${OPTARG};; esac done echo "SPRESENSE_SDK_PATH=${SPRESENSE_SDK_PATH}" echo "SPRESENSE_PORT=${SPRESENSE_PORT}" ${SPRESENSE_SDK_PATH}/sdk/tools/${PLATFORM}/flash_writer -s -c ${SPRESENSE_PORT} -d -e nuttx- Create the file .vscode/.gdbinit with the following content. Again a copy of a Spresense SDK project.
define hookpost-load if &g_readytorun != 0 eval "monitor nuttx.pid_offset %d", &((struct tcb_s *)(0))->pid eval "monitor nuttx.xcpreg_offset %d", &((struct tcb_s *)(0))->xcp.regs eval "monitor nuttx.state_offset %d", &((struct tcb_s *)(0))->task_state eval "monitor nuttx.name_offset %d", &((struct tcb_s *)(0))->name eval "monitor nuttx.name_size %d", sizeof(((struct tcb_s *)(0))->name) end end define connect target remote | openocd -s tools -f interface/cmsis-dap.cfg -f cxd5602.cfg -c "gdb_port pipe; log_output openocd.log" end- Configure the following items in your .code-workspace file. 3 dots mean that I left out unrelated parts. 5 dots mean that you need to use your paths here. If you follow the instructions for setting up a Spresense SDK project, then you can have a look there what is automatically created there.
{ ... "settings": { "spresense.sdk.path": "...../spresense-sdk/spresense", "spresense.sdk.tools.path": "...../spresense-sdk/spresense/sdk/tools", "terminal.integrated.env.osx": { "PATH": "/Users/jens/spresenseenv/usr/bin:..." }, "spresense.env.toolchain.path": "...../spresenseenv/usr/bin", "cortex-debug.armToolchainPath": "...../spresenseenv/usr/bin", "cortex-debug.openocdPath": "...../bin/openocd", } }- I have installed the Spresense SDK once, therefore have the paths for toolchain and openocd like above.
- I set the Arduino options to Debug, built and uploaded my sketch. Not sure if that was necessary.
- Set your breakpoints and start debugging for Main Core (your project name)
- For me it fails the first time. Just start debugging again. I did not yet investigate why.

I am working on macOS. It might be different on Windows. I recommend to try out the instructions for setting up a Spresense SDK and do the How to for using an ICE-Debugger. Then you have a reference. All parts are just a copy with few modifications from a Spresense SDK project.